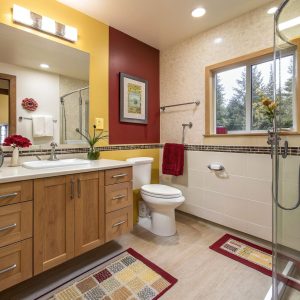
It is not easy to look at a kitchen that once worked fine and realize it now feels like an obstacle course. Many of us reach a point where standing for long periods, stretching, or lifting our arms high is painful or unsafe, and everyday tasks like chopping vegetables or washing dishes start to feel out of reach, both physically and emotionally. If you are caring for someone who uses a wheelchair or has limited mobility, you may be carrying extra worry every time they try to prepare a meal.
The gentle truth is that lowering countertops can make a kitchen calmer, safer, and more dignified for everyone who uses it. In simple terms, accessible counter height usually means about 30 to 34 inches from the floor (standard is about 36 inches), with clear space underneath for knees and feet if someone will be seated. For many families, the most practical approach is a mix of heights: at least one lowered work area, a lower section of sink or cooktop if possible, and careful planning of clearances so a wheelchair or walker can move freely.
Lowering countertops is not only about measurements; it is about giving someone the comfort and control to work in the kitchen without feeling like a guest in their own home.
Understanding who needs lower countertops (and how they are used)
Before anyone calls a contractor or picks out new cabinets, it helps to slow down and think about the person or people who will use the kitchen most. Different needs lead to different design choices.
- Wheelchair users
- People who alternate between standing and sitting
- People with limited reach, strength, or balance
- Caregivers who assist with cooking and personal care
Wheelchair users
If someone uses a wheelchair every day, counter height and knee space become very important.
Here are common guidelines that many therapists, building codes, and accessibility standards use:
| Feature | Typical wheelchair-accessible range |
|---|---|
| Counter height | 30 to 34 inches from finished floor |
| Clear knee height | At least 27 inches from floor to underside |
| Clear knee depth | At least 19 inches deep under countertop |
| Clear width for work surface | At least 30 inches wide |
These numbers help, but they are not the whole story. People sit at different heights in their wheelchairs, cushions can add an inch or more, and footrests can stick out. A tape measure, a chair, and a few minutes of observation are worth just as much as any chart.
You might find it helpful to:
- Seat the person in their usual wheelchair position.
- Slide a sturdy table or board in front of them at different heights between 30 and 34 inches.
- Ask which height feels comfortable for chopping, writing, or using a laptop.
The most accessible counter is the one that matches the real person in front of you, not a number in a book.
People who stand but tire easily
Some people can stand for short periods but fatigue or pain sets in quickly. Arthritis, heart or lung conditions, back problems, and many chronic illnesses can make long meal prep very hard.
For these situations, there are usually two goals:
- A standing-height counter that is not too high, to reduce shoulder strain.
- A seated-height area where a person can safely sit for chopping, mixing, or other tasks.
A low seated work surface around 30 inches often feels natural for someone sitting in a standard chair with arms relaxed. If a person is tall or uses an adjustable task chair, 32 to 34 inches may feel better.
Caregivers and shared use
Many caregivers prepare most of the meals, even in an accessible kitchen. This can create tension: the person with disability needs a lower surface, while the caregiver might be uncomfortable working bent over.
A few ways to support everyone:
| Need | Helpful choice |
|---|---|
| Shared cooking between caregiver and wheelchair user | One lowered section for seated work, standard or slightly lowered counters for standing |
| Caregiver does most tasks but person participates occasionally | Smaller lowered “helper” station for baking, chopping, hobbies |
| Multiple family members, different heights | Use at least two different counter heights in the design |
An accessible kitchen does not have to be one-height-fits-all; it can be a shared space where each person has a corner that truly suits them.
Choosing the right counter height for accessibility
Once we know who will use the kitchen and how, we can think through actual heights. The numbers below refer to the finished height from the floor to the top of the countertop.
Common counter height ranges
| Type | Typical height | Who it suits |
|---|---|---|
| Standard kitchen counter | 36 inches | Average standing adults with full mobility |
| Accessible seated work surface | 30 to 32 inches | Many wheelchair users and seated cooks |
| Compromise lowered counter | 33 to 34 inches | Some wheelchair users and standing caregivers |
| Desk-like surface | 28 to 30 inches | Writing, crafts, lower seated tasks |
You might find it useful to treat these ranges as a starting point, then adjust based on the real person and their chair.
Testing height before committing
Before building permanent cabinetry, it can calm a lot of worry to do a simple height trial:
- Use sturdy boards or a folding table that can be adjusted.
- Stack boards or use blocks to create surfaces at 30, 32, and 34 inches.
- Have the person slice something soft (like bread), stir a bowl, and reach across the surface.
- Ask where their shoulders feel most relaxed and where their wrists feel safe.
If a contractor or designer is involved, you might gently insist that this test happen before building starts. It can prevent costly changes later and can also make the person feel heard.
Mixing heights in the same kitchen
Many accessible kitchens use more than one counter height. Some examples:
- A 30-inch seated work area with knee space, beside 36-inch standard counters.
- A 34-inch section that includes the sink, so both a wheelchair user and a standing person can share the sink.
- A small 30-inch baking or prep station, with the rest of the kitchen closer to 36 inches for the primary cook.
This mix can protect the caregiver’s back while still giving the seated person a true working area, not just a token low space.
A thoughtful mix of heights often feels kinder to the body than forcing everyone to adapt to a single number.
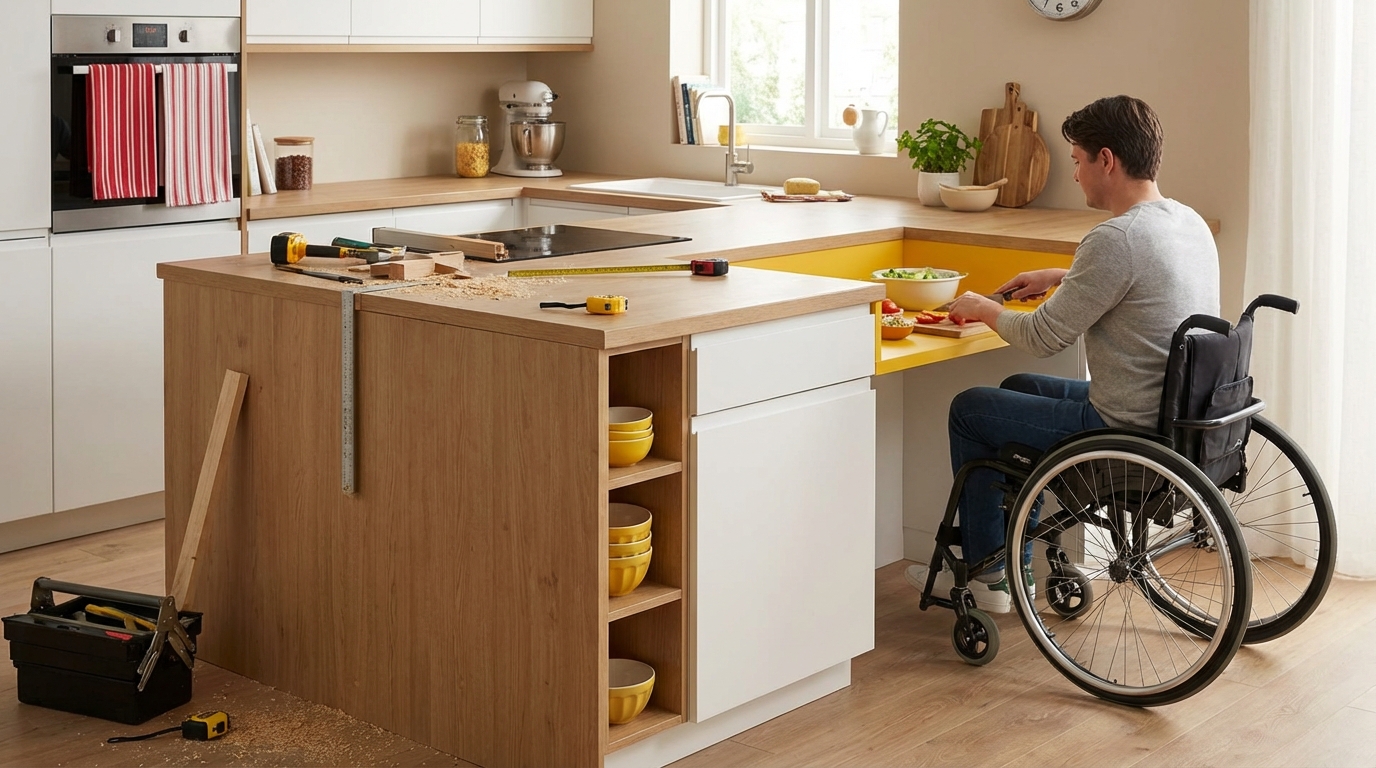
Designing knee space and clearances for wheelchairs and walkers
Lowering a countertop is only part of accessibility. People also need to get under and around it.
Knee and toe clearance under counters
For a wheelchair user to roll under and work at a counter, the space beneath must be open and tall enough.
Common targets are:
- At least 27 inches clear height for knees under the front edge.
- At least 19 inches deep at that full height.
- At least 30 inches width of open space.
The open space does not have to be bare. You can include:
- Shallow drawers that stop before the knee space starts.
- Removable cabinet doors that can be taken off when needed.
- Pull-out work surfaces that extend from under the counter.
A shallow toe kick (area at floor level where toes can slide under) of at least 6 inches high and 6 to 9 inches deep can also help the wheelchair get closer.
Clear floor area for turning and moving
For safe movement, a wheelchair generally needs:
| Movement | Recommended clear area |
|---|---|
| Full 180-degree turn | 60-inch diameter circle, or a T-shaped space |
| Passing by an open dishwasher or oven | At least 36 inches, preferably 42 inches of aisle width |
| Parallel work aisles for two people | 42 to 48 inches between counters |
You might walk through the kitchen and imagine the widest chair you expect to use, then add some “wiggle room” for hands, footrests, and open doors.
If a person has to twist uncomfortably or back out awkwardly, the kitchen is not yet truly accessible, no matter how low the counters are.
Where to lower countertops for the biggest impact
Not every inch of counter must be lowered. For many families, targeted changes bring most of the benefit.
Lowered primary work zone
A good first step is to create one main accessible work zone where most prep tasks can happen. Ideally this zone has:
- Lowered counter height suited to the person.
- Clear knee space beneath for sitting.
- Drawers nearby with daily tools: knives, cutting boards, bowls.
- Easy access to trash or compost.
Placing this area between the fridge and the sink can reduce reaching and carrying.
Lowered sink area
For many people, washing hands, rinsing vegetables, and cleaning dishes are key parts of independence. A fully accessible sink area often involves:
- Counter at 30 to 34 inches.
- Shallow sink (5 to 6 inches deep) to reduce bending or excessive reach.
- Insulated or protected hot water pipes to prevent burns on knees.
- Single-lever or touch-control faucet within easy reach.
There are three main options:
- One entire sink lowered.
- A multi-level sink with a lowered front section.
- Two sinks, one standard height and one lowered.
For shared households, two sinks or a multi-level design often allows a standing caregiver to work comfortably while a seated person uses their own portion.
Lowered cooktop or range area
Cooking with heat brings extra safety concerns. A lowered cooktop can work well if:
- The controls are front- or side-mounted, not behind hot pots.
- There is knee clearance beneath, but also heat shielding.
- There is at least a small amount of counter space on each side.
A few safety-minded choices:
- Induction cooktops, which keep surfaces cooler around the pans.
- Automatic shutoff features.
- Wall ovens installed at a reachable height, with pull-out shelves.
Not every family feels comfortable with a seated person cooking directly over heat. In those cases, the lowered area can serve as a staging and prep space beside a standard-height range that the caregiver uses.
Secondary lowered areas for hobbies and social connection
Sometimes the most meaningful part of a kitchen is not the practical prep, but the chance to join family activity. A small lowered section at the end of an island or near the table can allow:
- Helping frost cookies or stir batter with grandchildren.
- Preparing a simple snack independently.
- Doing bills, crafts, or phone calls while close to the action.
This may not require full knee clearance; sometimes a 30-inch table-height surface is enough.
Construction choices: cabinets, supports, and countertops
Once the layout is clear, the next questions are about how to physically create the lower surfaces and keep them stable and safe.
Cabinet options for lowered counters
There are several common approaches:
- Shorter base cabinets: Cabinets built at 28 to 30 inches high, with standard countertops on top.
- Standard cabinets on a lower toe kick: Reducing the toe-kick height or recess can lower the counter by 1 to 3 inches.
- Wall-mounted countertops: Counter supported by brackets, with no cabinets beneath, to create full knee space.
- Open shelves instead of doors: To avoid bending and allow easier reach from a seated position.
Each choice affects storage. Some families accept less cabinet space to gain open access. Others use creative storage nearby, such as pantry cabinets with pull-out shelves.
Supporting the countertop safely
Lowered counters, especially those without full cabinets underneath, need strong support to handle daily use and occasional leaning.
Common supports include:
- Heavy-duty steel or aluminum brackets fixed into wall studs.
- Legs at the front corners, sometimes adjustable, with clear space in the middle.
- Reinforced sub-tops that spread weight across multiple supports.
You might ask the contractor to show the type of bracket or support they plan to use and to confirm the weight rating. This can be reassuring if someone may lean or brace themselves on the counter.
Countertop materials and edges
Some materials are kinder to joints, easier to clean, and safer for people with limited strength or sensation.
| Material | Pros | Considerations |
|---|---|---|
| Laminates | Lightweight, smooth, budget-friendly, many colors | Can chip or swell if water seeps into seams |
| Wood / butcher block | Warm feel, slightly softer on dropped dishes | Needs sealing; can stain or scratch |
| Solid surface (e.g., Corian types) | Non-porous, repairable scratches, smooth joints | Costs more than laminate; can be damaged by high heat |
| Quartz / stone | Durable, attractive, heat resistant (to a point) | Heavy, more costly; very hard surface can chip dishes |
Rounded edges can reduce bumps and bruises, especially at seated head and arm level. A simple eased or rounded edge tends to feel safe and gentle.
In an accessible kitchen, the way a surface feels to the touch can matter just as much as how it looks to the eye.
Adjustable-height and flexible solutions
Not every family is ready for permanent renovations, and some households change over time. There are ways to create adjustable or temporary lowered surfaces.
Height-adjustable countertops and tables
Some systems allow a section of counter to raise or lower using:
- Hand cranks.
- Gas-lift mechanisms.
- Electric motors with wall or remote controls.
These can be helpful when:
- Multiple people of very different heights share the same space.
- Children with disabilities will grow and their needs will change.
- A person may stand sometimes and sit at other times.
Electric systems should have safety stops and be installed by someone who understands both electrical codes and weight loads.
Portable and semi-permanent options
If a full remodel is not possible right now, a few lower-cost steps can still support accessibility:
- A sturdy rolling kitchen cart at 30 to 32 inches high, with locking wheels.
- A height-adjustable table used as a prep station near the main kitchen.
- Lowered cutting boards that rest securely on top of an existing counter, with raised edges to prevent slipping.
These do not replace a fully accessible kitchen, but they can reduce daily frustration and give a person some independent space.
Storage, appliances, and small details that support lower counters
Lowering countertops often leads naturally to rethinking storage and appliances, so the whole space works together.
Storage within reach
When someone works at a lowered surface, it helps to keep their most used items nearby and at reachable heights.
| Storage type | Helpful features |
|---|---|
| Base cabinets | Full-extension drawers instead of doors; pull-out shelves |
| Upper cabinets | Mounted lower, or with pull-down racks; or omitted above seated zones |
| Pantries | Slide-out drawers, shallow shelves to avoid deep reaching |
| Open shelves | Frequently used items at mid-height, not above shoulder level |
You might walk through a sample day and ask:
- Where will we keep the kettle, toaster, favorite mug?
- Can the seated person reach at least one full set of dishes and basic food items?
- Is there a safe spot for sharp knives that is reachable by the caregiver but secure if there are children or cognitive concerns?
Appliance placement around lowered counters
Appliances interact closely with counter height.
Some thoughtful placements include:
- Microwave: On a shelf or counter about 30 to 36 inches from the floor, so hot items are lifted down only a short distance.
- Dishwasher: To the side of or just under a lowered sink section, with controls on the front and not hidden at the top edge of the door.
- Refrigerator: Models with side-by-side doors or bottom freezers often give better access from a seated position.
- Oven: Wall oven with a side-opening door, mounted so the middle rack is at about elbow height when seated.
You might avoid placing appliances directly under the main knee space, unless they are compact or designed for that use, such as under-counter fridges.
Lighting and visibility at lower heights
When counters are lowered, shadows from upper cabinets can fall differently, and older eyes may struggle with contrast.
Some gentle steps:
- Under-cabinet lights over lowered areas, with switches easy to reach.
- Warm, diffuse lighting to reduce glare on shiny surfaces.
- Contrasting colors between counter edges and floors to help those with low vision see boundaries.
Good lighting helps prevent spills, cuts, and misjudged distances, and it can lower anxiety for people who already feel unsure in the kitchen.
Safety, comfort, and emotional well-being in an accessible kitchen
Lower counters are part of a larger picture that includes physical safety and emotional comfort.
Reducing fall and injury risks
Beyond heights and clearances, many families choose added safety measures:
- Non-slip flooring that is easy to roll on and easy to clean.
- Clear, clutter-free walkways with no small rugs that can catch wheels or feet.
- Grab bars or sturdy handles near key spots, such as by the sink or in narrow passes.
- Rounded corners on islands and lowered sections at wheelchair head height.
When the environment quietly supports balance and movement, the mind is free to focus on the joy of cooking and sharing meals.
Thermal comfort and protection
A person sitting under or near counters can be closer to hot pipes, hot appliance sides, and steam.
You might ask installers to:
- Insulate hot water pipes, especially under accessible sinks.
- Add heat shields near cooktops and ovens at knee level.
- Provide good ventilation over cooking areas to remove steam and smoke.
Using oven mitts that fit well, sturdy pot handles, and lighter-weight cookware can also protect weaker hands and wrists.
Emotional impact and independence
For many people, the kitchen is closely tied to identity: being a parent, a host, a person who cares for others. Losing the ability to use this space comfortably can feel like losing a piece of oneself.
Lowered countertops, and the thought behind them, can help restore:
- A sense of purpose: “I can make my own breakfast again.”
- Dignity: “I do not need to ask for every little thing.”
- Connection: “I can cook with my family at the same level.”
At the same time, change can stir grief or resistance. Some people feel that accepting an “accessible” feature means accepting a decline.
It can help to:
- Involve the person actively in every design decision, not just inform them after.
- Focus on comfort and ease, not on disability labels.
- Blend accessible features into the overall style of the home, so the space looks welcoming, not clinical.
Working with professionals and managing costs
Renovations can feel overwhelming, both financially and emotionally. A calm, step-by-step approach helps.
Who might be involved
Potential helpers include:
- Occupational therapists, who understand daily living tasks and body mechanics.
- Certified aging-in-place or accessibility specialists, who design for long-term use.
- Contractors or carpenters with experience in accessible or adaptive renovations.
- Local building inspectors, who can explain code requirements early.
You might ask direct questions such as:
- “Have you built a kitchen with lowered counters and knee space before?”
- “Can we walk through how a wheelchair will move in this plan?”
- “How would you protect hot pipes under a lowered sink?”
If a professional seems to dismiss accessibility concerns, it is reasonable to seek someone who listens more carefully. It is better to pause and find the right partner than to rush into a design that will not truly serve the person you care about.
Budgeting and phasing the project
A full kitchen remodel can be expensive, and not every household can manage everything at once. It can be helpful to prioritize.
Here is one way to think about phases:
| Phase | Changes | Impact |
|---|---|---|
| Phase 1 | Portable lowered table or cart; rearrange storage; add lighting | Quick relief; low cost; not a full solution |
| Phase 2 | One permanent lowered work area; some pull-out storage; safety improvements | Core independence for food prep |
| Phase 3 | Lowered or multi-level sink; adjust appliances; widen pathways | Fuller independence; shared use more comfortable |
| Phase 4 | Adjustable-height counters; custom cabinetry; full remodel | Most flexible long term, highest cost |
You might check local resources for financial assistance such as:
- Government home modification programs for disability or aging in place.
- Nonprofit grants focused on accessibility.
- Veterans’ programs, if relevant.
Common mistakes to avoid when lowering countertops
Sometimes families put time and money into renovations, only to find that daily life has not improved as much as hoped. Being aware of common missteps can protect you from that frustration.
Lowering everything without a plan
Some people think “accessible” means simply lowering all counters. This can create:
- Back strain for standing caregivers and family members.
- Less storage without clear benefits to the seated person.
- A space that looks odd and still does not function well.
Focusing instead on key zones and real tasks tends to create a kinder and more balanced kitchen.
Ignoring actual user feedback
Designers or contractors sometimes rely only on guidelines. If they do not ask the main user how they move, feel pain, or prefer to cook, the final result might not serve that person.
You might gently insist that:
- The main user is present at at least one design meeting.
- Mock-ups or on-site tests happen before final installation.
- There is room in the plan to adjust minor details late in the process.
Creating knee space that is too small
Sometimes sketches show knee space, but in real life the person cannot roll close enough because pipes, supports, or shallow depth block them.
To avoid this:
- Measure the wheelchair: seat height, leg length, footrest extent.
- Discuss exact depth and width of open space with the contractor.
- Check that supports, pipes, and hardware will not intrude into that space.
Overlooking reach range
Lower counters might help with working height, but what about upper cabinets, outlets, and controls?
You might aim for:
- Frequently used items between 15 and 48 inches from the floor.
- Light switches and outlets that can be reached from a wheelchair.
- No critical controls placed where a seated person must stretch fully or twist.
True accessibility is when a person can move, reach, and control their space without constant help and without fear of falling or overreaching.
Bringing it all together in daily life
Once the dust of renovation settles, there is a gentle period of adjustment. Everyone in the household learns new rhythms:
- The wheelchair user may practice rolling in, turning, and working at the new height.
- The caregiver may learn new body positions that feel kinder to their own back and shoulders.
- Children or visitors may need guidance about where to store items so they stay within reach.
You might schedule one quiet evening just to “play” in the new space:
- Prepare a simple meal together.
- Notice any awkward reaches, tight turns, or confusing storage spots.
- Make a small list of tweaks, such as moving a shelf or adding a hook.
Even after careful planning, real life will show where small changes can make the kitchen even gentler and more supportive.
Lowering countertops for accessibility is not only a construction project. It is a way of saying to someone: “You belong in this kitchen. Your comfort and independence matter here.” When we keep that message at the heart of our decisions, the measurements and materials tend to fall into place with more clarity and peace.